Check whether your PC is ready, then follow the seven steps from a story to a finished video. Everything is on this one page — search it, or use the outline on the left.
📌 Who can use Studio right now
Available now
Professional members — distributed free of charge during the beta, not a separate purchase.
Coming next
Supporter members — access will be extended while testing continues. Announced on the support page.
Not included
Trial accounts cannot open Studio. Starter accounts cannot launch it either.
Studio launches from the Google Flow Automator extension and checks your membership at start-up, so sign in to the extension with the account that holds your membership. See Membership tiers.
Read this first
Requirements
Narration, music and captions run on your own PC, so check the specification before you install. You do not need a graphics card unless you want Local AI.
This is what Studio needs to make a full video on your PC: local narration (Local TTS), local background music (Local BGM) and captions. No graphics card is required — Google Flow draws the pictures, and Gemini in Chrome writes the plan.
GA Studio with Local TTS & Local BGM
Component
Minimum
Recommended
OS
Windows 10 64-bit2004 / build 19041
Windows 11 64-bit
CPU
4 threadsi3-8100 · Ryzen 3 2200G
8 threads or morei5-12400 · Ryzen 5 5600
Memory
8 GB RAM
16 GB RAM
Graphics
Not required
Optional: NVIDIA GPU with 4 GB+speeds up Local TTS · Asian
Storage
6 GB free
12 GB free (SSD)both voice engines + music + captions
Browser
Google Chrome with Google Flow Automator signed in
What each local service needs: Local TTS about 1.5 GB, 8 GB RAM (16 GB recommended) · Local TTS · Asian (Korean, Japanese, German) about 3 GB, 8 GB RAM, runs on the CPU · Local BGM about 3 GB, 16 GB RAM recommended · Local Captioning about 470 MB, 8 GB RAM and 4 CPU threads. A slower PC takes longer; the result is the same.
With Local AI optional — only if you want the plan written on this PC
Local AI is the one part of Studio that needs a graphics card. Add these on top of the requirements on the left.
⚠ Integrated graphics cannot run Local AI (Intel UHD / Iris Xe, AMD Radeon Graphics).
PC below that? Use Gemini in Chrome. It writes the plan in your own signed-in Chrome — free, no API key, no graphics card — and it writes better plans than Local AI anyway.
System Check — are you ready to use Studio?
This reads this PC and tells you whether Studio's local narration, music and captions will run well — and whether Local AI fits, or you should write with Gemini in Chrome.
Windows version
CPU threads
Memory
Graphics & VRAM
Runs entirely in your browser. Nothing is uploaded or stored.
Getting started read this first
What Studio does, how to get it running, and the seven steps every video goes through.
What does GA Studio do?
GA Studio turns a story or a topic into a finished, narrated short video. You describe what the video is about; Studio writes the plan, has Google Flow draw every picture through the Google Flow Automator extension, gives the script a voice, lays captions over it and renders an MP4. You can stop and correct anything at every step.
Everything happens in one guided flow — the seven-step Story to video wizard. The numbered bar at the top of the window always shows where you are, and you can click any step to go back.
Install and open Studio
Download and install. Use the signed installer from the Studio page. Never download GA Studio from a third-party site.
Sign in to the extension. Open Google Flow Automator in Chrome and sign in with the account that holds your membership.
Open Studio from the extension. Studio checks your membership as it starts.
The first launch — Set up your private creator workspace
The first time Studio opens it explains how your work is handled — projects and media stay on your PC, and every network connection is one you choose — and offers four optional local services. Each runs entirely on your PC: free and private, but demanding on hardware.
Service
Download
What it does
Local AI
~6 GB
Writes and improves narration and checks pictures on this PC. Needs a dedicated graphics card with 6 GB of memory or more.
Local Captioning
~470 MB
Turns spoken audio into timed captions without uploading it.
Local TTS
~4.5 GB
Offline narration voices. The Asian engine adds Korean, Japanese and German.
Local BGM
~3 GB
Composes background music on this PC.
💡 Not sure? Press Skip for now. Everything can be installed later from Settings → Local AI & Models, and Studio works without any of them — Gemini in Chrome can write the plan and a cloud voice can read it.
The first-launch workspace setup.
How a video is made — the seven steps
Step
What happens
1 · Draft
You write the story and pick a length, a look (picture style) and who writes the plan.
2 · Plan
The AI writer returns the story spine and a scene-by-scene plan: narration and picture prompts.
3 · Images
Google Flow draws every picture, through the Google Flow Automator extension in Chrome.
4 · Review
You check each picture against its narration and redo any that are wrong.
5 · Captions & overlays
You set how captions look and where they sit.
6 · Narration & music
Studio voices the script and adds background music.
7 · Preview & export
You watch the finished video and render the MP4.
Every screenshot in this guide comes from a real project, SAMPLE - CRAFT: a 63-second, 7-scene Short about mountain glaciers made with the Craft infographic look.
What do I need before I start?
GA Studio installed, with a Professional membership.
Google Chrome with Google Flow Automator installed and signed in — Studio uses it in Step 3 to draw your pictures.
A Google account that can use Google Flow — and, if you want Gemini to write your plan, the same account signed in to Gemini in Chrome.
Optional: API keys (OpenAI, Claude, Gemini, ElevenLabs) and local components. Neither is required to make a video.
Projects
The project library, and how a new video starts.
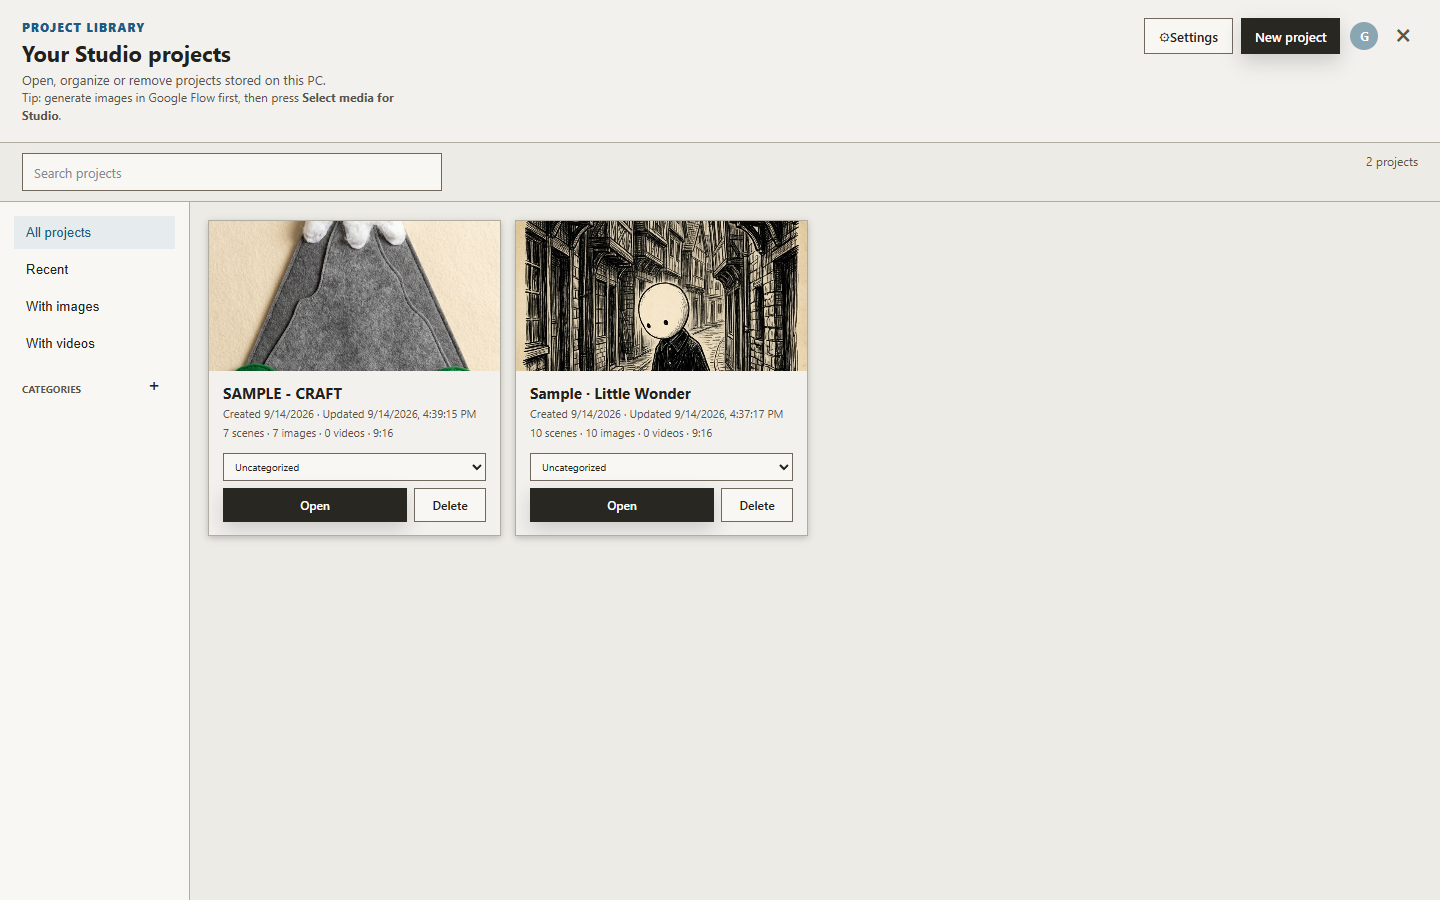
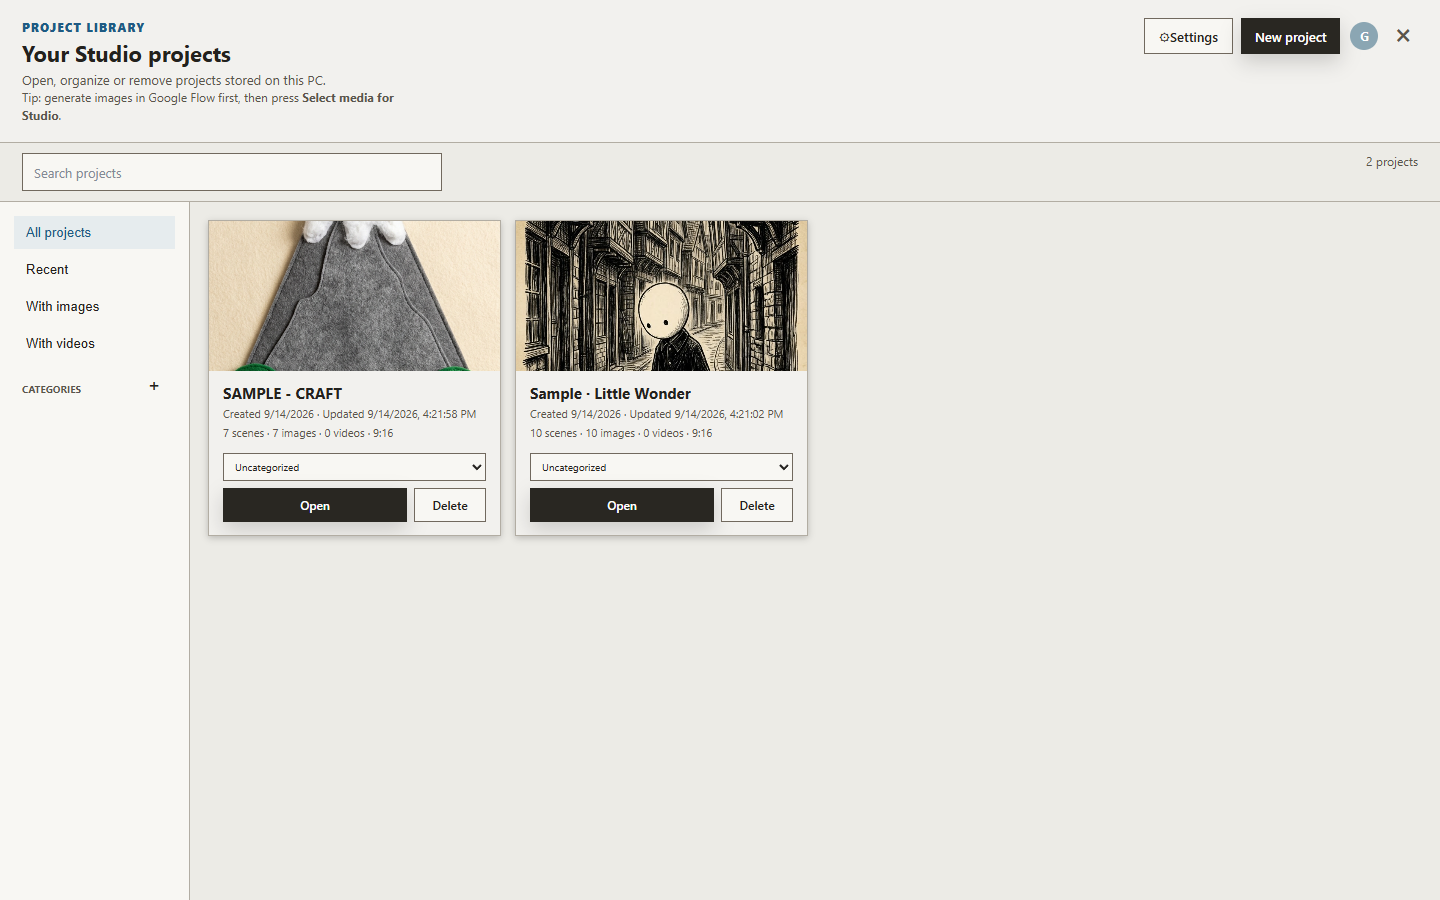
Your Studio projects
New project (top right) starts a new video.
Open continues a project exactly where you left off; Delete removes it.
Each card shows scenes, pictures, videos and the aspect ratio — 9:16 is a vertical Short, 16:9 widescreen.
Filter by Recent, With images or With videos. Press + beside Categories to make folders, then file a project from the dropdown on its card.
Studio saves automatically after every change, so there is no Save button to remember in the wizard.
The project library.
Starting a new project
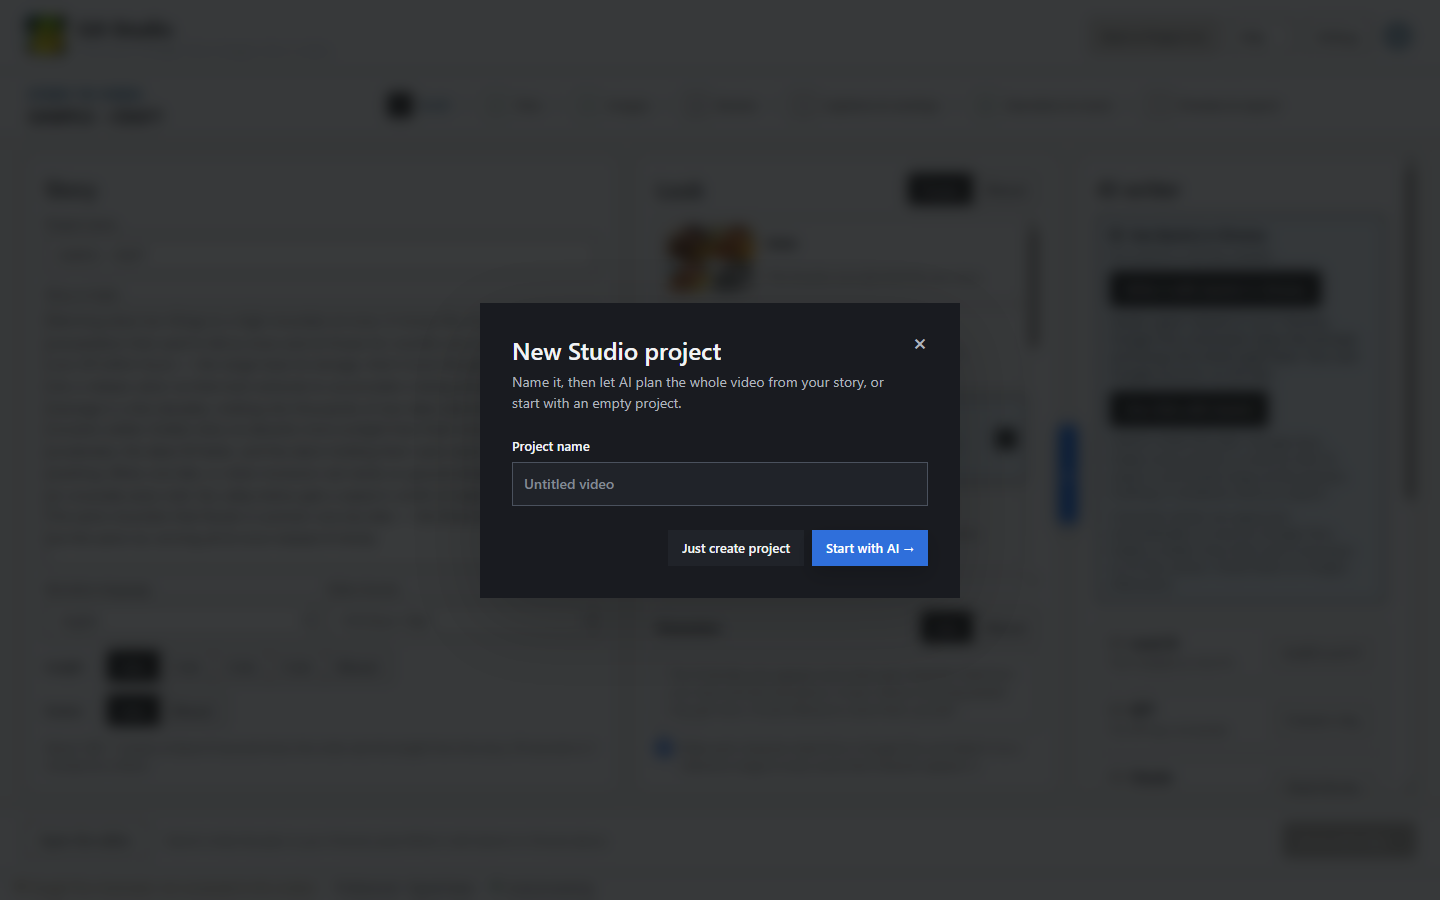
Press New project, give it a name, then choose:
Start with AI → — the recommended path. Opens the seven-step wizard at Step 1.
Just create project — an empty project in the timeline editor, for when you already have your own pictures and script.
New Studio project.
Step 1 · Draft tell Studio what to make
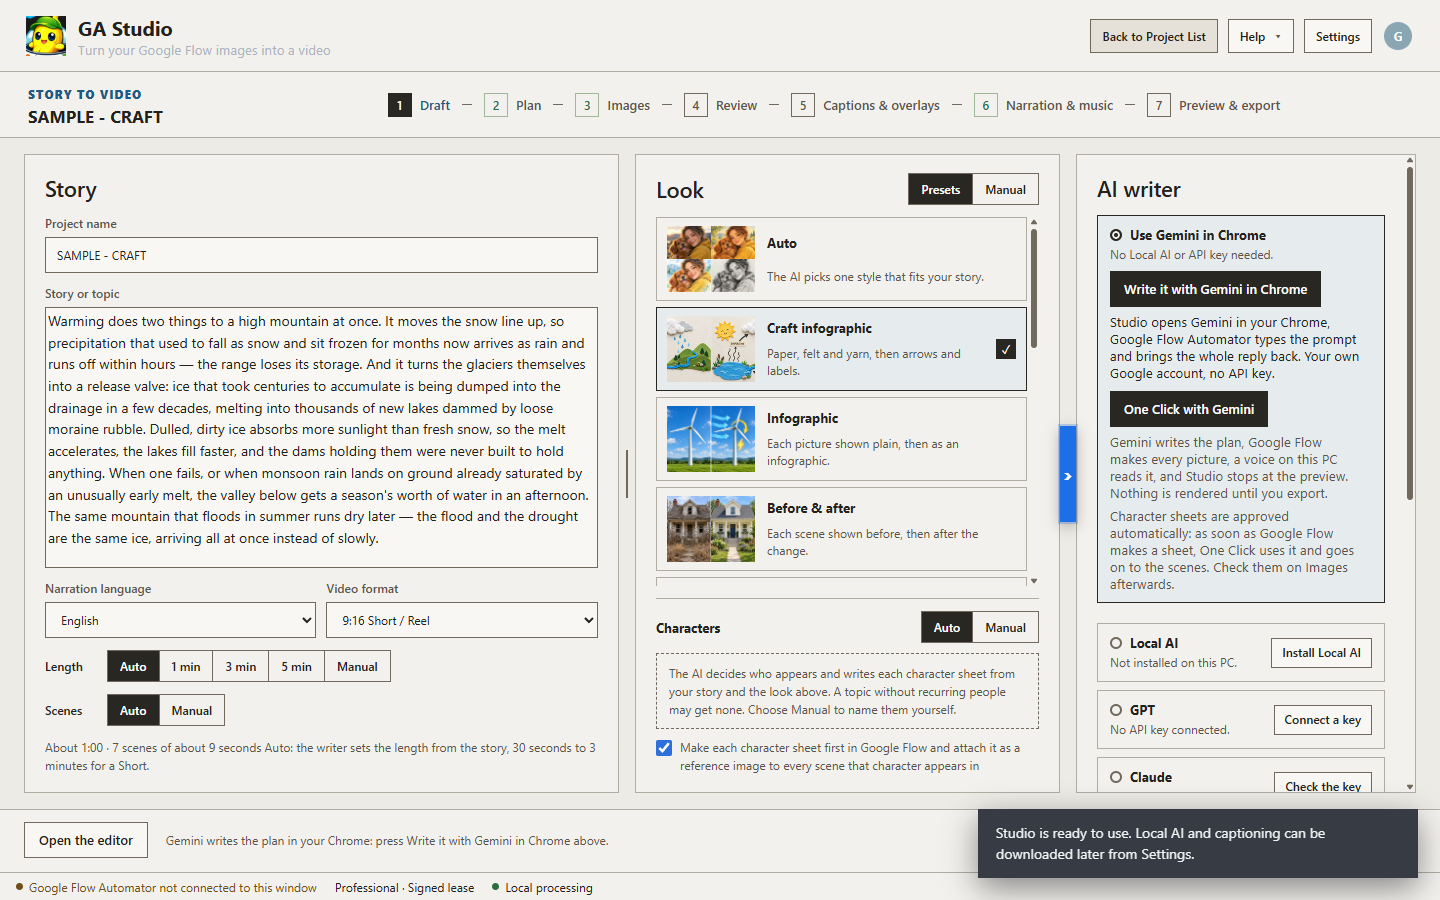
Three columns, filled left to right: the story, the look, and who writes the plan.
The Draft screen
Draft — Story on the left, Look in the middle, AI writer on the right.
Story — the box that decides your results
Story or topic — a single sentence works; a paragraph with the facts, the angle and the ending you want works much better.
Narration language — the language of the voice and the captions (separate from the Studio interface language).
Video format — 9:16 Short / Reel for vertical phone video, or 16:9 for widescreen.
Length — Auto lets the writer choose (30 seconds to 3 minutes for a Short), or pick 1 min, 3 min, 5 min or Manual.
Scenes — Auto or Manual. The line underneath estimates the result, e.g. "About 1:00 · 7 scenes of about 9 seconds".
Look — how every picture is drawn
Pick one of the Presets, or switch to Manual and describe your own style.
Look
What you get
Auto
The AI picks one style that suits your story.
Craft infographic
A handmade felt, paper and yarn diorama — then the same diorama with arrows, yarn paths and short labels. Two pictures per scene.
Infographic
A realistic picture — then the same picture with arrows, labels and a key figure. Two pictures per scene.
Before & after
The scene before a change — then the same view after it. Two pictures per scene.
X-ray / Cutaway
An object from outside — then the same view cut open. Two pictures per scene.
The four explaining looks tell each scene in two beats. The scene opens on a clean picture while the narrator sets it up; then, at the moment the narrator gets to the point, an explained version of the same picture fades in over it.
1 · Plain — shown first2 · Explained — fades in on "This natural storage…"
The pair is called Plain / Explained (Infographic and Craft), Before / After, or Outside / X-ray.
The explained picture is drawn from its own plain picture, so it keeps the same camera, objects and colours — and can only be made after the plain one exists.
Because each scene has two beats, these looks plan fewer, longer scenes of about 8½ seconds.
They make still pictures only.
Characters
Auto — the AI decides who appears and writes a character sheet for each recurring person or mascot. A topic without recurring people gets none.
Manual — name the characters yourself.
Make each character sheet first in Google Flow and attach it as a reference image… — keep this ticked so a character looks the same in every scene.
AI writer — who writes the plan, and when to use each
Writer
Use it when…
You need
Use Gemini in Chrome → Write it with Gemini in Chrome
You want good writing for free. The best choice for most people.
Chrome, the extension, and your Google account signed in to Gemini. No API key.
One Click with Gemini
You want Studio to do everything and just review the result.
Local AI installed and a graphics card with 6 GB+ memory. Simpler writing than the cloud options.
GPT, Claude, Gemini
You already pay for an API key and want the strongest writing.
A key connected with Connect a key. Uses your API credits.
Plan with ChatGPT, Claude or Gemini without API keys
You prefer another chat AI but have no key.
Any chat AI in a browser — copy the prompt there, paste the whole reply back.
How "Write it with Gemini in Chrome" works
Press Write it with Gemini in Chrome.
First time only — you must allow access. Chrome opens a page titled Let GA Studio write with Gemini. Press Allow Gemini, then press Allow in the permission box Chrome shows. If you press Not now or Deny, Gemini cannot write the plan.
Chrome opens Gemini and Studio's prompt is sent there. Keep that tab visible until Gemini has finished.
The reply comes back to Studio and opens as your plan.
If anything goes wrong, Studio says so and offers the copy-and-paste route — you never lose the prompt.
⚠ The first time you use Gemini in Chrome, you have to press Allow. Chrome asks once whether Google Flow Automator may use gemini.google.com — press Allow Gemini on the page that opens, then Allow in Chrome's box. Without it, nothing is written. Missed it? Press Write it with Gemini in Chrome again and the question comes back.
💡 This route is available for Gemini only. For ChatGPT or Claude, connect an API key or use the copy-and-paste route.
Step 2 · Plan fix the story before anything is drawn
The cheapest moment to change the story: nothing has been drawn or voiced yet.
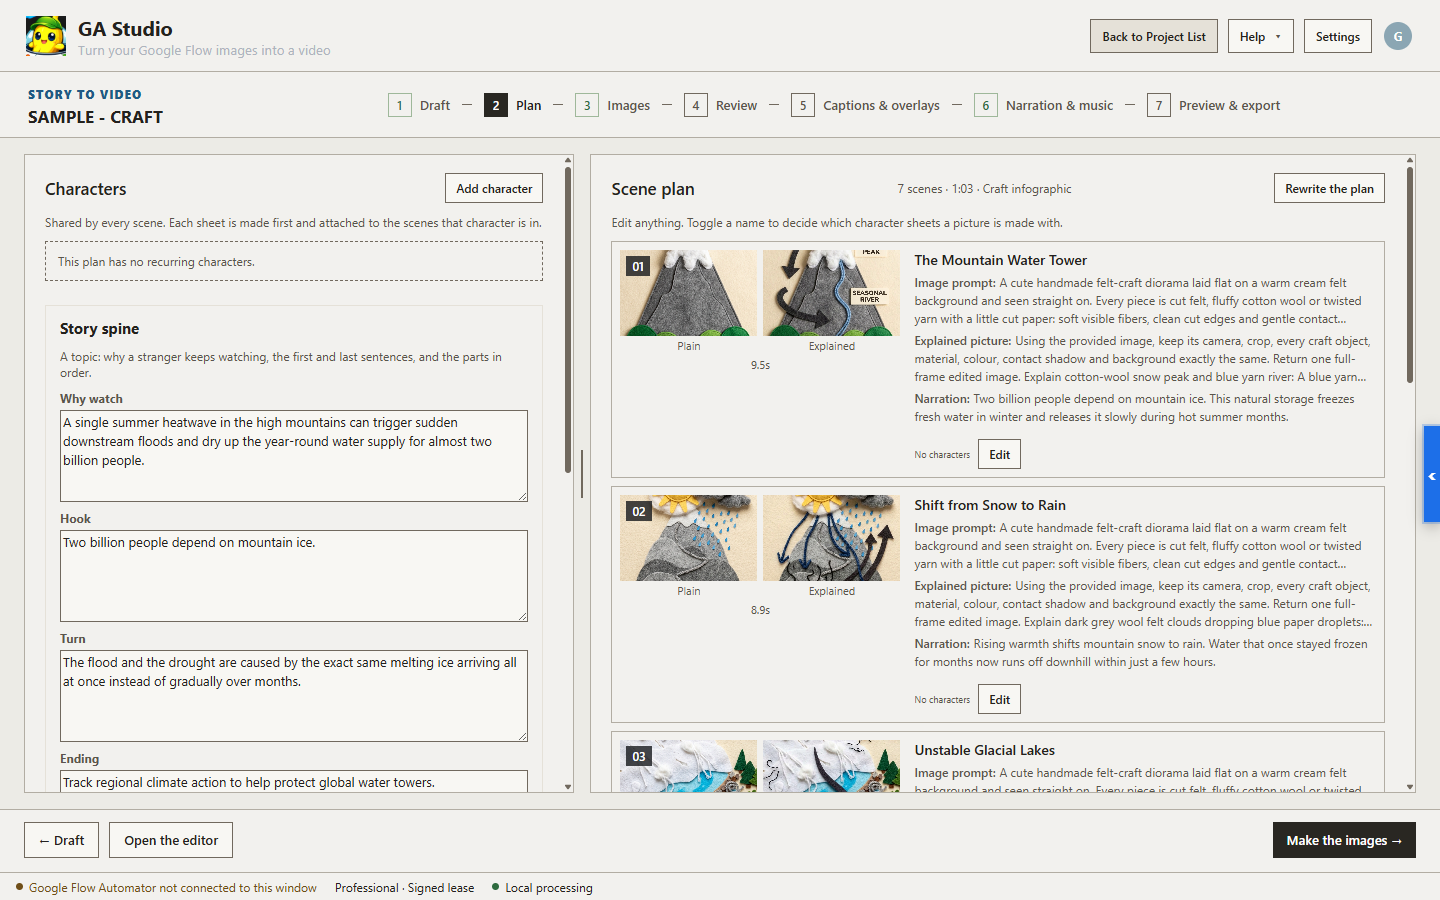
The Plan screen
Characters and story spine on the left, the scene plan on the right.
Story spine — four lines that hold the video together
Why watch — why a stranger would keep watching.
Hook — the exact first sentence, meant to grab attention in 3 seconds. Sample: "Two billion people depend on mountain ice."
Turn — what changes in the middle.
Ending — the exact last sentence, so the video lands instead of trailing off.
Edit any of them directly.
Scene plan
The header shows the totals (e.g. "7 scenes · 1:03 · Craft infographic"). Each scene card lists the Image prompt (what Google Flow will draw), the Explained picture (for two-picture looks), and the Narration. Toggle a character name to choose which character sheets are used as references.
Edit — change one scene.
Rewrite the plan — have the writer produce a new version.
Add character — add a character sheet yourself.
Make the images → — continue to Step 3.
Step 3 · Images Studio and the extension work together
GA Studio holds the prompts; Google Flow Automator takes them to Google Flow in your own Google account and brings every picture back. You press one button — the rest happens in Chrome while Studio shows the progress.
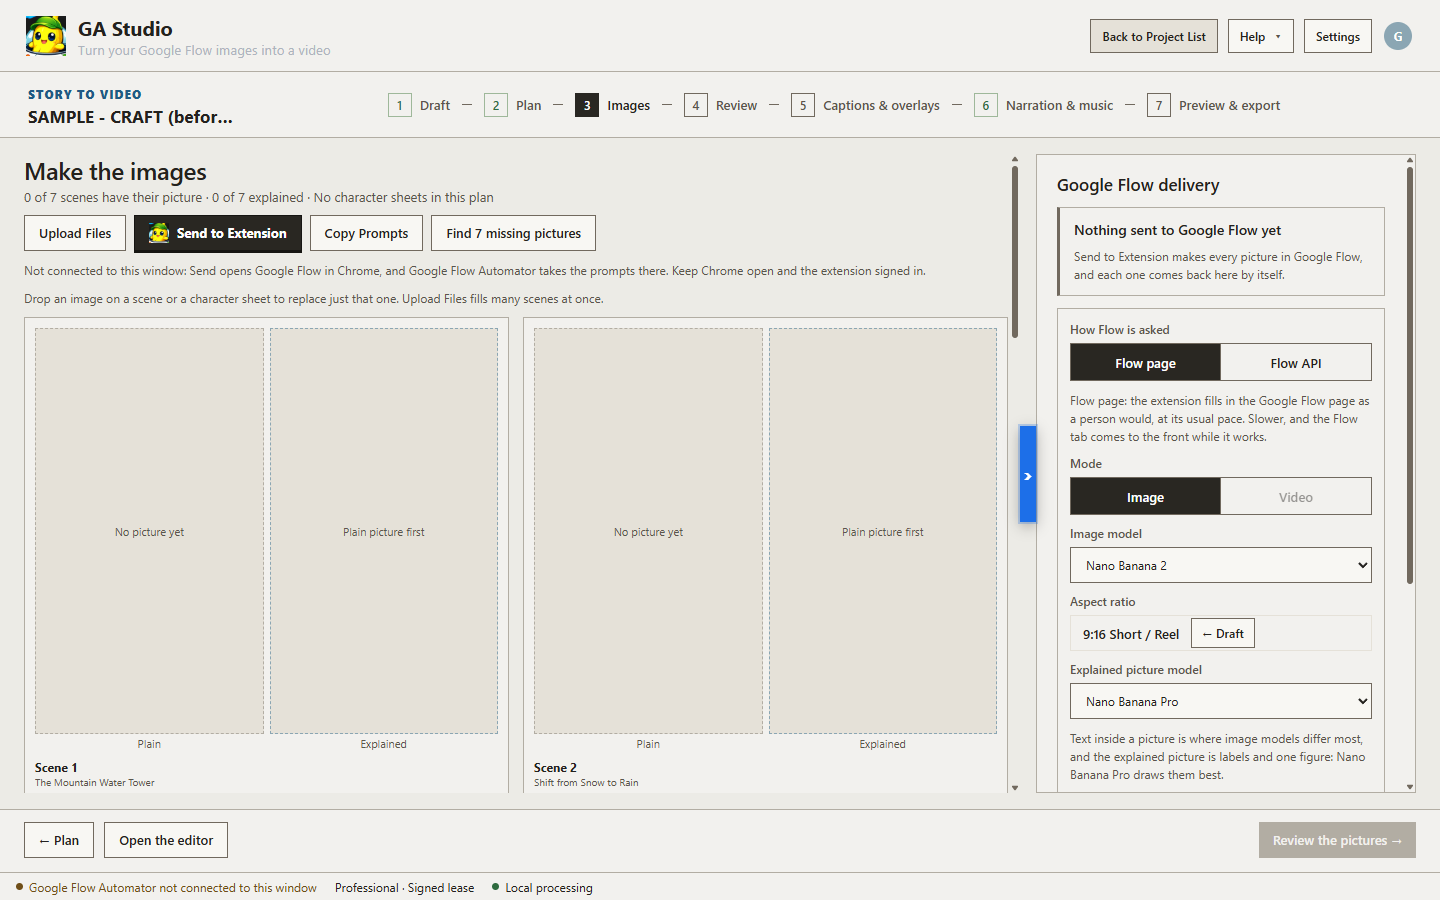
Before you press Send
Before anything is sent: "No picture yet" and "Plain picture first" on every card, "Nothing sent to Google Flow yet" on the right.
Chrome is open and Google Flow Automator is signed in.
You are signed in to Google Flow with the same Google account.
Check the right-hand panel — How Flow is asked, Image model, Explained picture model and Label style. These travel with the Send, so there is nothing to set in the extension.
"Not connected to this window: Send opens Google Flow in Chrome…" is normal. Studio simply hands the prompts over through Chrome.
What happens when you press Send to Extension
#
In GA Studio
In Chrome — Google Flow Automator
1
You press Send to Extension. The panel shows Waiting for Google Flow Automator to take the prompts.
Chrome comes to the front and opens Google Flow. Each video gets its own Flow project, created the first time and reused afterwards.
2
Google Flow Automator took the prompts · Starting in Google Flow…
The extension's side panel opens with the pictures in its queue. If it stays closed, press Open Google Flow Automator panel on the card at the bottom right of the Flow page, or click the extension icon.
3
Cards change from No picture yet to Waiting in Flow, then Making now…. The panel shows Google Flow is making the picture · 0:42.
The queue starts by itself. Rows are named after the scenes and move through the Open, Completed and Failed tabs.
4
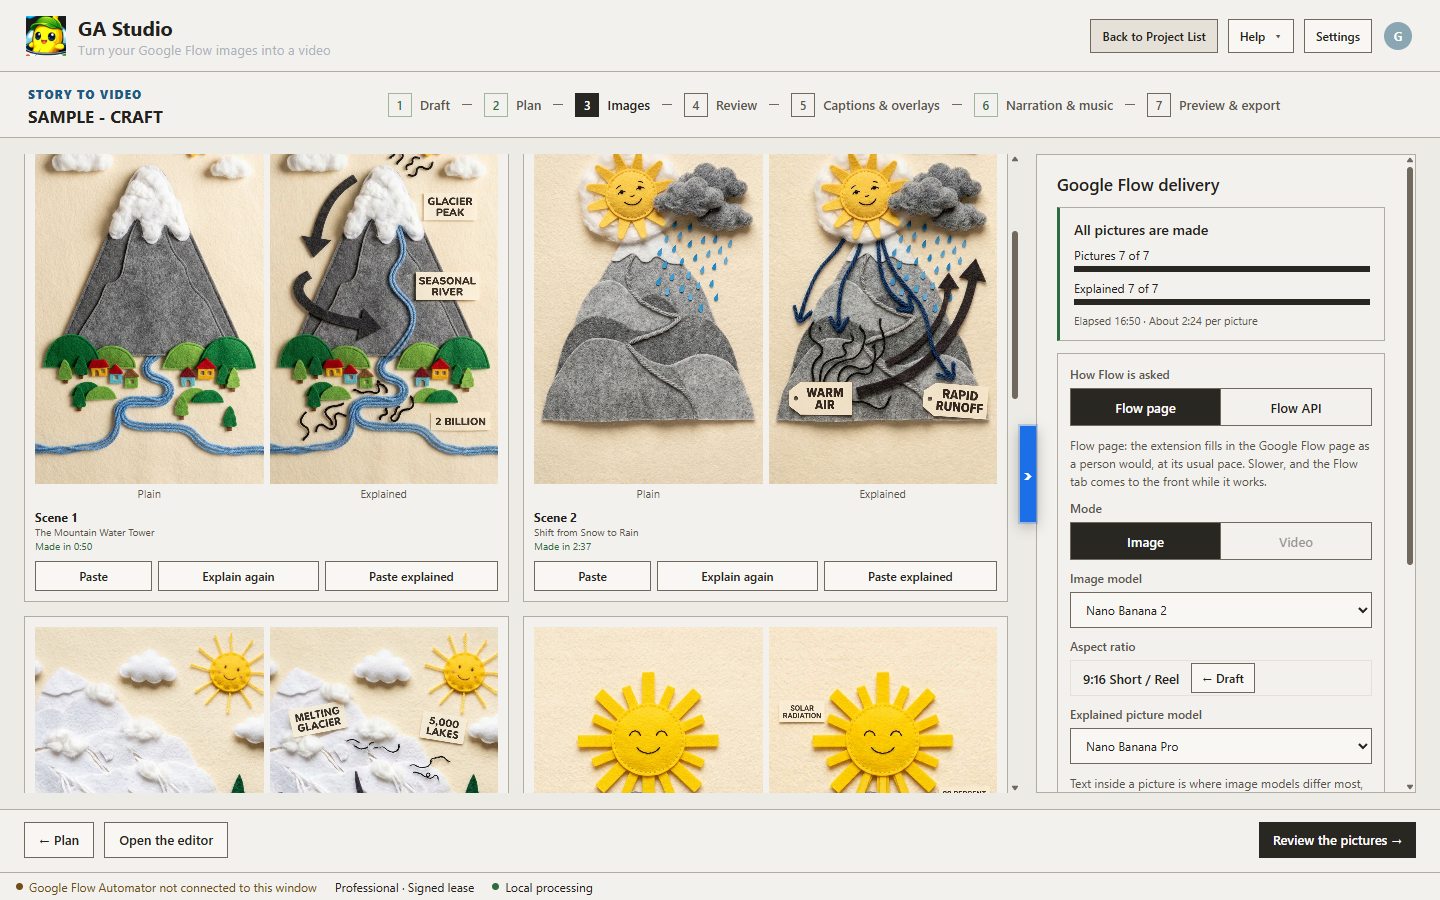
The card shows Downloading, then the picture appears with Made in 0:50.
Chrome downloads the finished picture and the extension hands it to Studio. No files to move.
5
When every plain picture is in, Explained cards change to Generating in Flow.
The explained pictures join the queue. Each is an edit of its plain picture, which is why they come after.
6
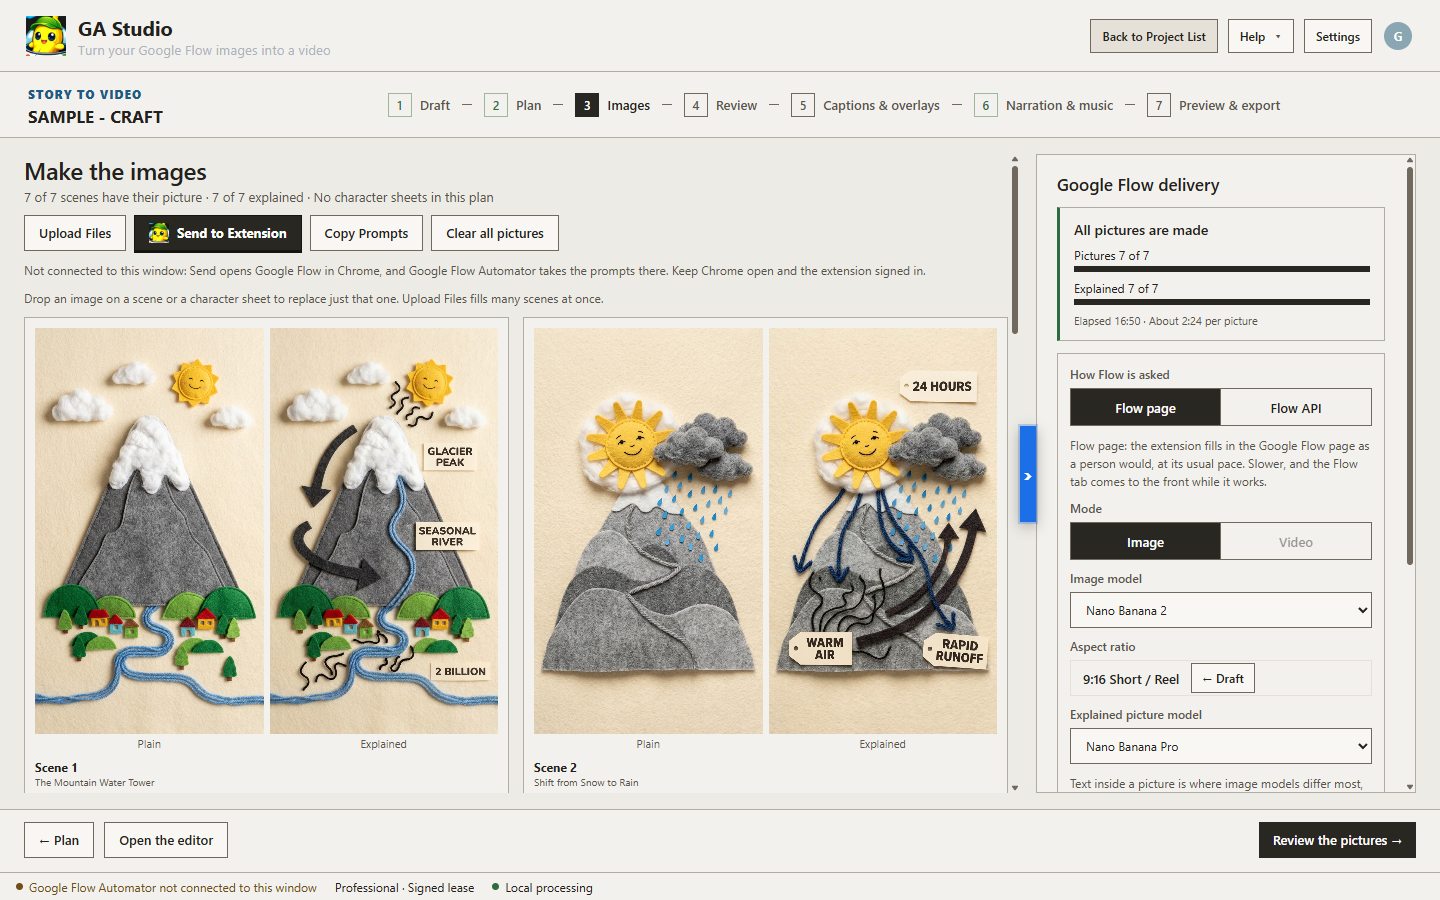
All pictures are made · Pictures 7 of 7 · Explained 7 of 7
The queue is empty. You can close the Flow tab.
A picture takes about 1–3 minutes in Google Flow (the sample averaged 2:24), so a 7-scene two-picture video takes roughly 15–20 minutes. The extension also rests between pictures — Studio says On a break · resumes in… or Next picture in…. Keep Chrome open and the PC awake; nothing needs clicking.
When every picture is made: plain and explained pictures on each card, "All pictures are made" on the right.
The order pictures are made in
Character sheets first — only when the plan has characters and the reference box is ticked. Press Make the character sheets, then approve each with Use this sheet (or Make again / Upload my own). Send to Extension stays off until every sheet is approved.
Plain pictures — one per scene, in scene order.
Explained pictures — two-picture looks only, sent automatically once the plain pictures are in.
Buttons on the Images step
Button
What it does
Send to Extension
Sends every picture still missing to Google Flow. Pressing it twice never makes anything twice.
Copy Prompts
Copies all prompts so you can paste them into Google Flow yourself.
Upload Files
Adds many pictures you already have at once. Dropping an image on one card replaces just that picture.
Find N missing pictures
Looks through your Downloads for pictures Flow made that never reached Studio.
Clear all pictures
Takes every picture off its scene to start again. A version is saved first.
Paste / Paste explained
On each card: paste a picture you copied in Google Flow onto this scene.
Explain again
On each card: make this scene's explained picture again.
Each scene card has its own buttons.
A picture with a problem is outlined in red with the reason under it. Press Make the N marked pictures again, or Looks fine if the picture is actually right.
Google Flow settings (right panel)
How Flow is asked — Flow page (default): the extension works in the Google Flow page at its usual pace, and the Flow tab comes to the front. Flow API: faster, no visible tab needed; it is experimental, and Studio switches back to Flow page by itself if needed.
Mode — Image. Video is not available yet.
Image model — the model for plain pictures.
Explained picture model — text inside a picture is where models differ most; Nano Banana Pro draws labels best.
Label style — how labels look in explained pictures: UI mode or Background mode. The previews under the buttons show the difference.
If the extension needs you
Studio shows
What to do
Waiting for Google Flow Automator to take the prompts
Open Chrome and sign in to the extension. Open Google Flow opens the right page.
Google Flow Automator did not take the prompts
Press Send to Extension again.
Google Flow Automator in Chrome needs a reload
Reload the extension in chrome://extensions, then press Continue: send the N missing.
Stopped / Paused in Google Flow Automator
Press Start in the extension's side panel.
Google Flow paused picture making
Wait a while, turn off any VPN or proxy, then press Start in the side panel.
No word from Google Flow Automator for…
Keep Chrome open and the PC awake — it carries on by itself.
Nothing has come back for…
Press Continue: only the missing pictures are sent.
Step 4 · Review check every picture
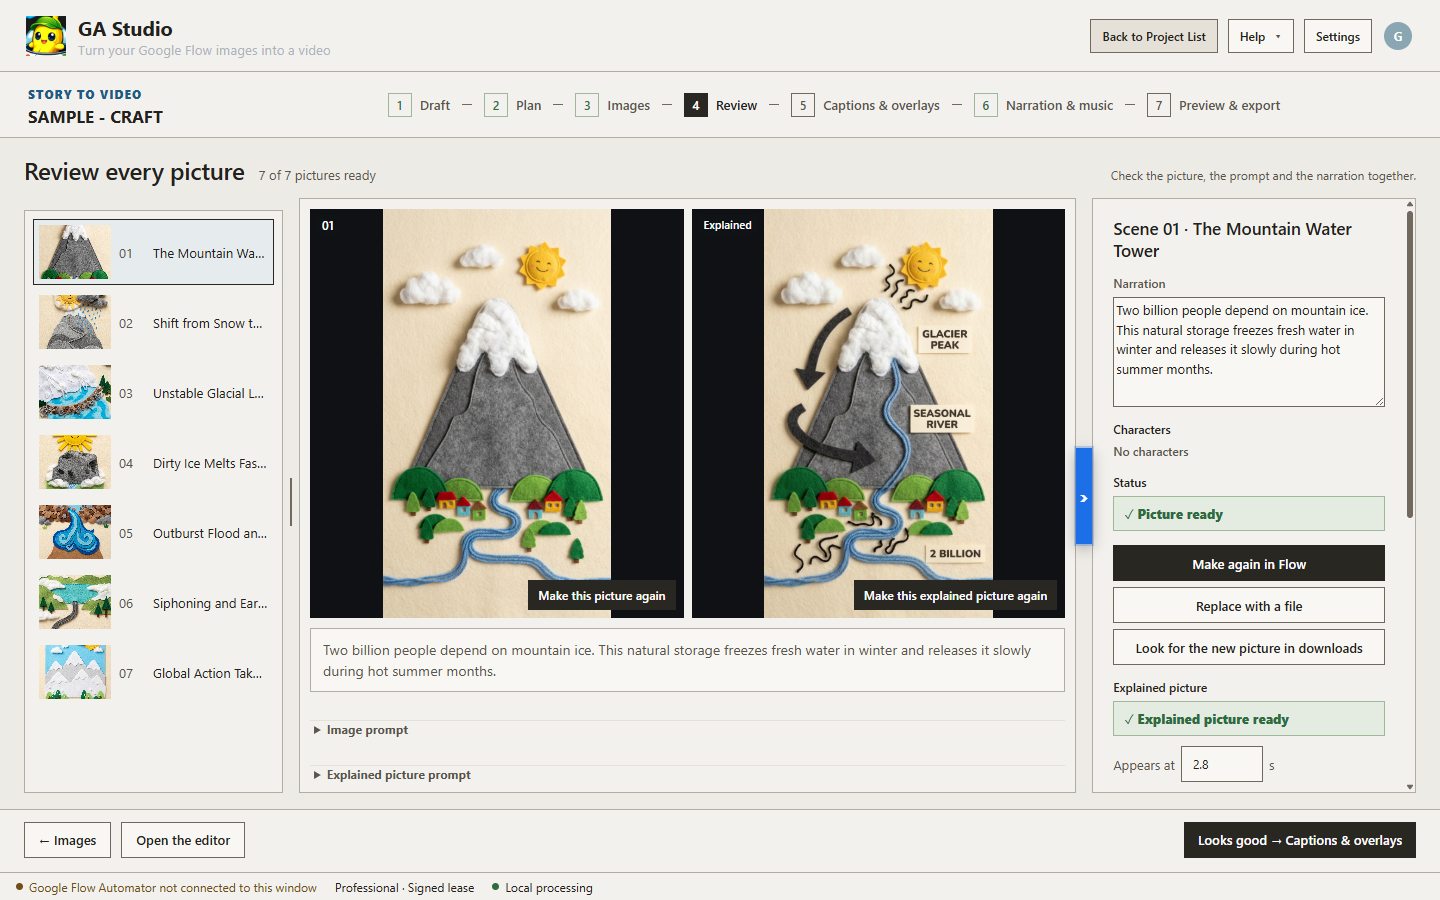
Click through the scenes and ask one question: does the picture show what the voice is saying?
The Review screen
Scene list, the pictures with their narration, and the scene's controls.
If a picture is wrong
Make this picture again or Make again in Flow — asks Google Flow for a new version.
Make this explained picture again — redraws only the explained version from the current plain picture.
Replace with a file — use your own image instead.
Look for the new picture in downloads — if Flow made it but it never arrived.
Open Image prompt or Explained picture prompt under the narration to see — and edit — exactly what was asked for before trying again.
Appears at — timing the explained picture
Appears at is the second at which the explained picture starts to fade in. Studio sets it to the moment the narrator says the words the explanation is about, and updates it whenever the narration changes. Type a number to set it yourself; Match the narration hands control back to Studio.
When every scene shows Picture ready (and Explained picture ready), press Looks good → Captions & overlays.
Step 5 · Captions & overlays
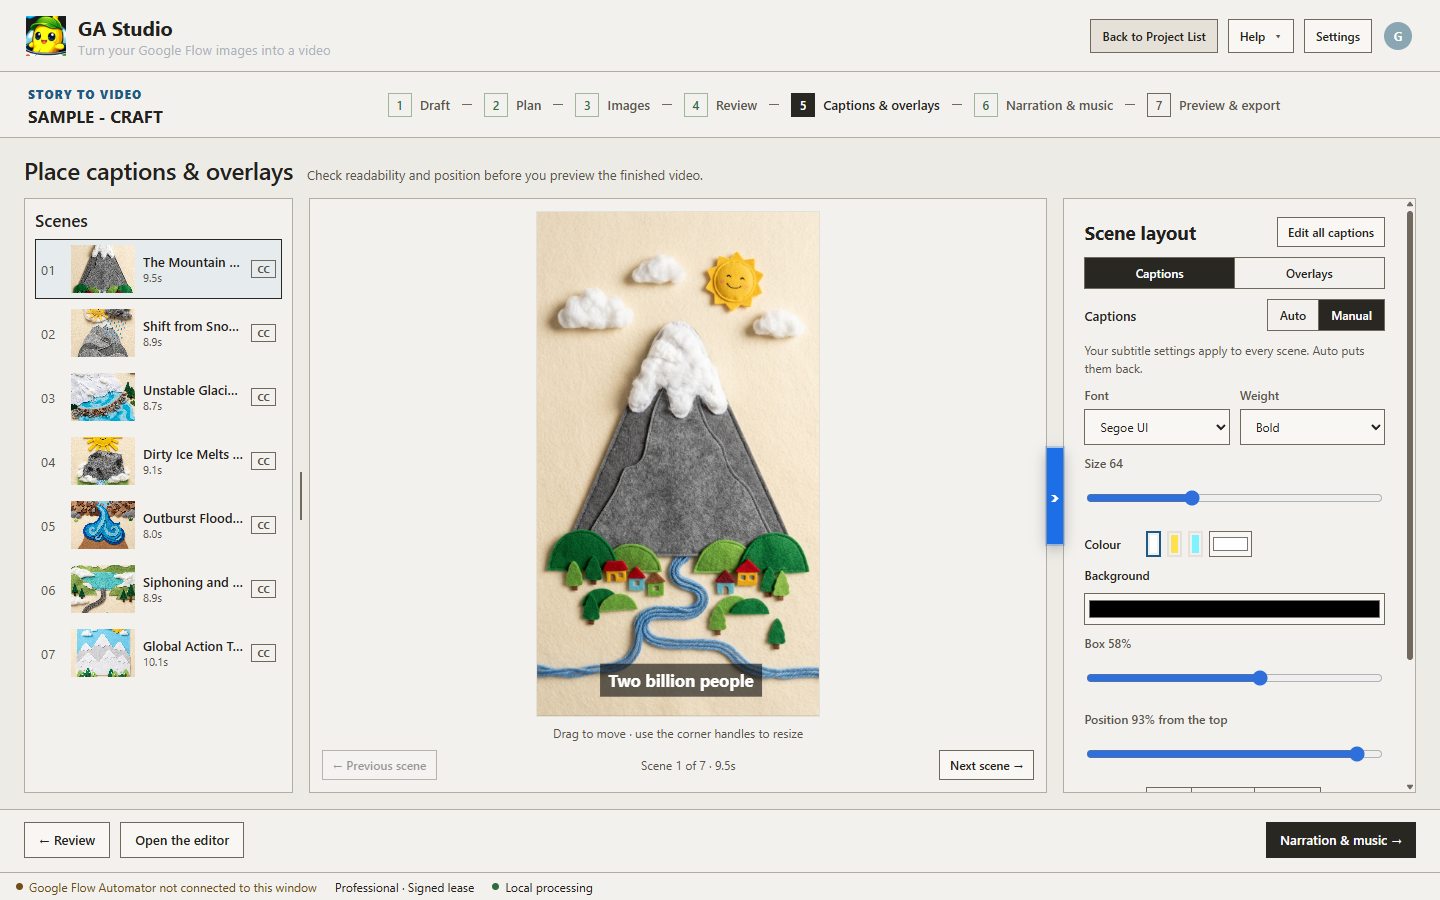
Studio splits the narration into short captions and times them to the voice. This step is about how they look.
Styling captions
Captions & overlays, with a live preview.
Scenes (left) — pick a scene to preview, or use Previous scene / Next scene. A CC mark means the scene has captions.
Auto / Manual — Auto picks a size, position and font for your format and language. Change anything and Studio switches to Manual; press Auto to go back.
Font, Weight, Size, Colour, Background, Box and Position apply to every scene. You can also drag the caption on the preview and resize it by its corners.
Overlays tab — extra layers on the picture for the scene you are on.
Edit all captions
Every caption of the video in one list, one line = one caption. Fix a typo or split a long caption onto two lines; changed words also become that scene's narration, so voice it again afterwards.
Step 6 · Narration & music
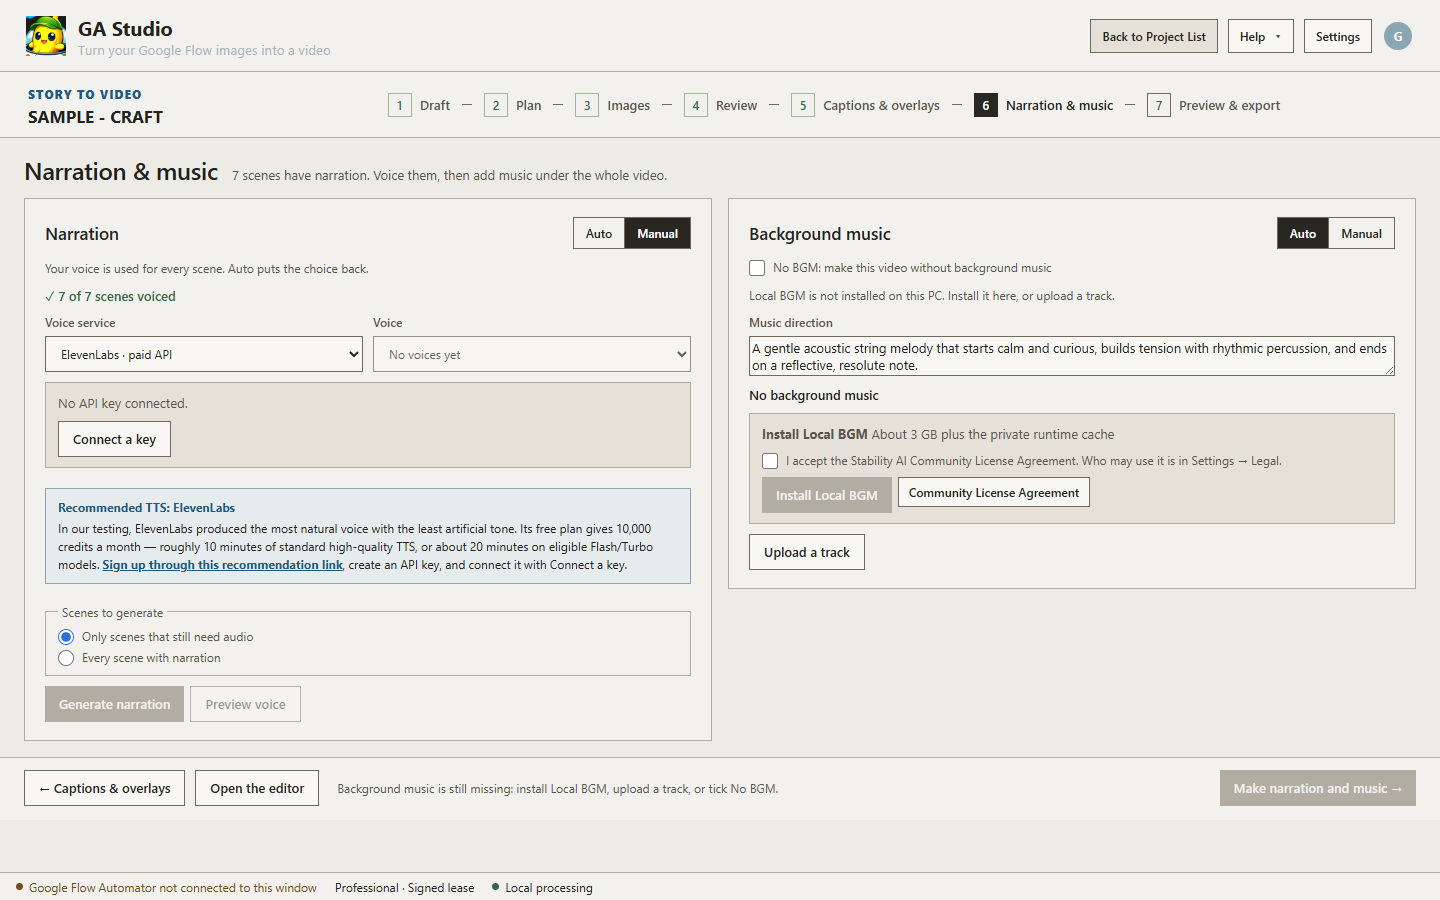
Give the script a voice, then put music under the whole video.
The Narration & music screen
Narration on the left, background music on the right.
Narration — choosing a voice
Auto picks a voice that speaks your narration language, on this PC when possible. Manual uses the voice you choose for every scene.
Voice service, then Voice.
Voice service
Cost
Notes
Local TTS
Free, offline
Runs on this PC once installed. Korean, Japanese and German use the Local TTS · Asian engine automatically. Fewer voices; faster with an NVIDIA GPU.
ElevenLabs
Your ElevenLabs credits
The most natural voices in our testing, in many languages. Needs a key — Connect a key.
OpenAI
Your OpenAI credits
Good cloud voices with an OpenAI key.
Scenes to generate — Only scenes that still need audio (normal) or Every scene with narration (after changing the voice).
Preview voice plays a short sample; Generate narration voices the scenes.
Background music
Auto — Local BGM writes music for your story, mixed quietly under the voice and faded out at the end. Manual — set the volume and fades yourself.
Music direction — genre, mood, tempo and instruments. The writer suggests one from your story.
Install Local BGM — needed to compose music on this PC (about 3 GB; accept the Stability AI Community License first).
Upload a track — use your own music.
No BGM: make this video without background music — the step is not finished until you have music or tick this.
Make narration and music → voices anything still missing, makes the music if needed, and opens the last step.
Step 7 · Preview & export
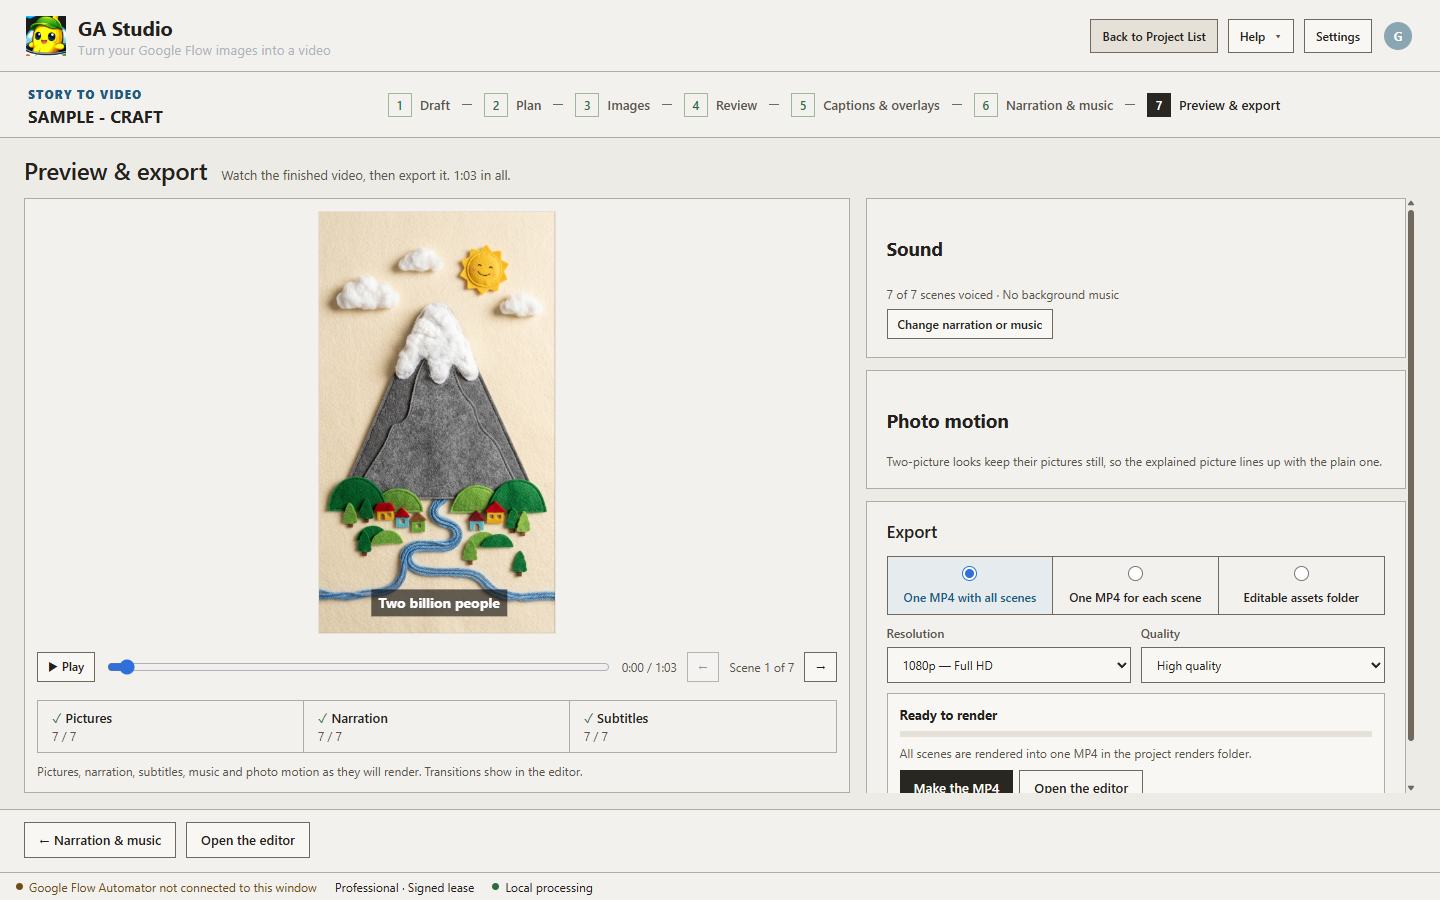
Watch the finished video exactly as it will render, then make the MP4.
Preview
Preview & export.
Press Play. The ticks under the player — Pictures, Narration, Subtitles — confirm nothing is missing. Change narration or music jumps back to Step 6. Two-picture looks keep their pictures still so the explained picture lines up exactly with the plain one; other looks add gentle photo motion.
Export options
Option
Result
One MP4 with all scenes
The finished video, ready to upload — press Make the MP4.
One MP4 for each scene
Numbered clips, one per scene, for another video editor.
Editable assets folder
Pictures, audio and captions as separate files.
Resolution: 2K, 1080p (recommended), 720p or 480p. Quality: High quality, Balanced or Smaller file. Finished videos are saved in the renders folder inside the project folder.
The fast route — One Click with Gemini
One Click with Gemini on the Draft step runs Steps 2 to 6 for you: Gemini writes the plan, Google Flow draws every picture (character sheets are approved automatically), a voice on your PC reads the script, and Studio stops at Preview & export. Nothing is rendered until you press Make the MP4, so check the pictures on Images and Review first.
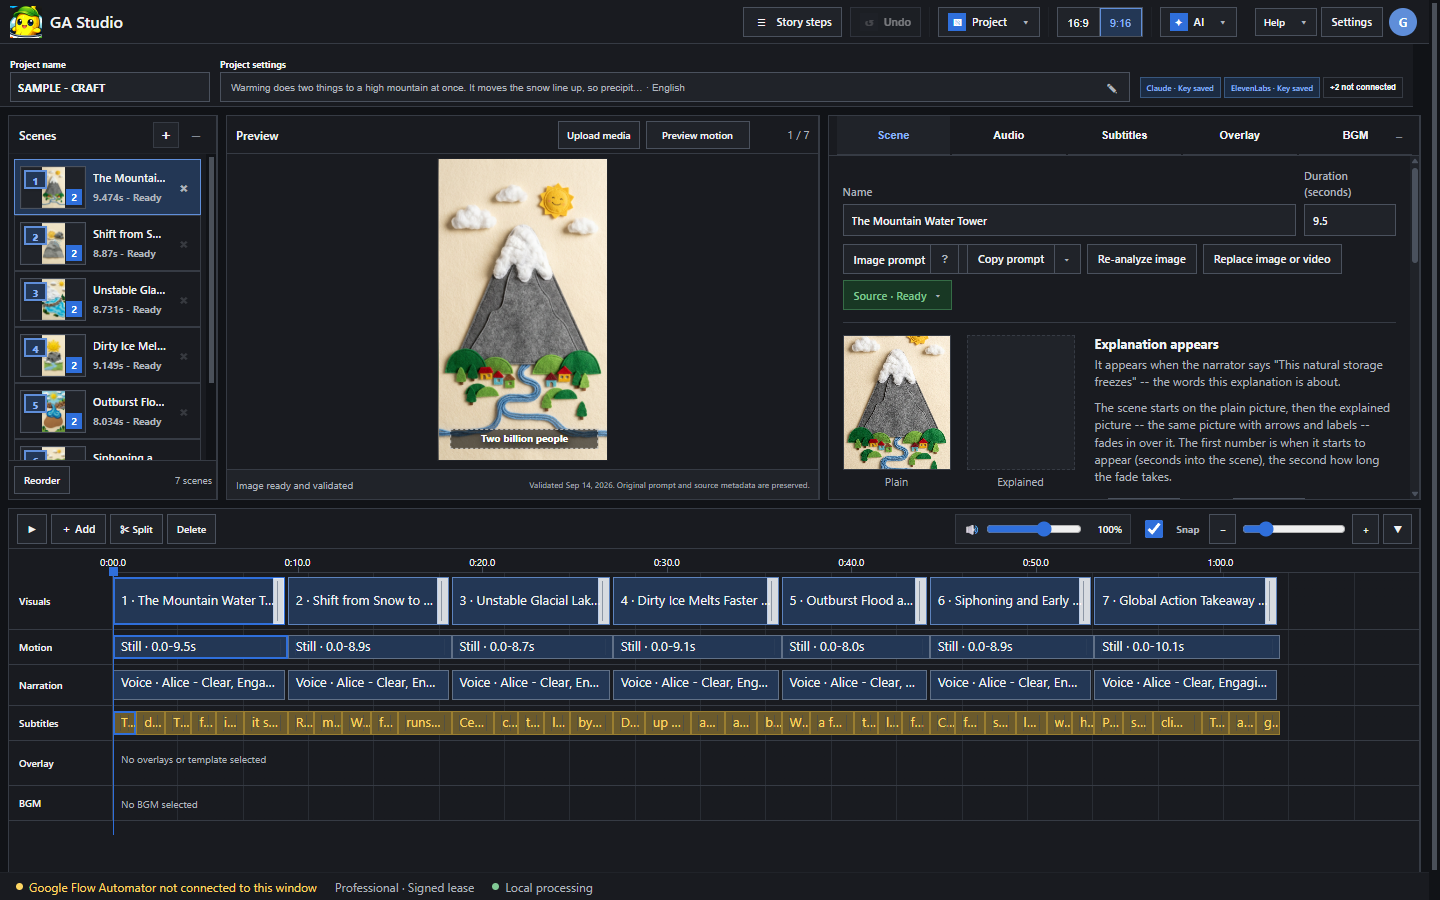
Timeline editor occasional use
Everything above happens in the wizard. The editor is for the odd fine adjustment.
When to open the editor
Open the editor (bottom of every wizard step) switches to a scene-by-scene timeline; Story steps returns to the wizard.
The timeline editor.
Scene tabs on the right: Scene (name, duration, prompt, replace picture), Audio (narration, speed, voice, CC Retiming), Subtitles (start and end of each caption), Overlay (text, stickers, emoji, images, templates) and BGM.
The timeline has rows for Visuals, Motion, Narration, Subtitles, Overlay and BGM. Drag clip edges to change durations; Split and Delete act on the selected clip.
AI → Narration / Caption Editor shows the whole script in one dialog, with Save subtitles as CSV and Import edited CSV. AI → Generate Approved Narrations voices every approved scene at once.
The Project menu holds Project settings, Export / Import prompt CSV, Export, Save and Project List.
Settings
Open Settings from the top right of any screen.
The Settings tabs
Tab
What is there
General
Studio interface language (separate from narration language), your Google Flow Automator account, membership, and your user ID — press Copy ID when contacting support.
Storage
Where Studio keeps projects and downloads on this PC.
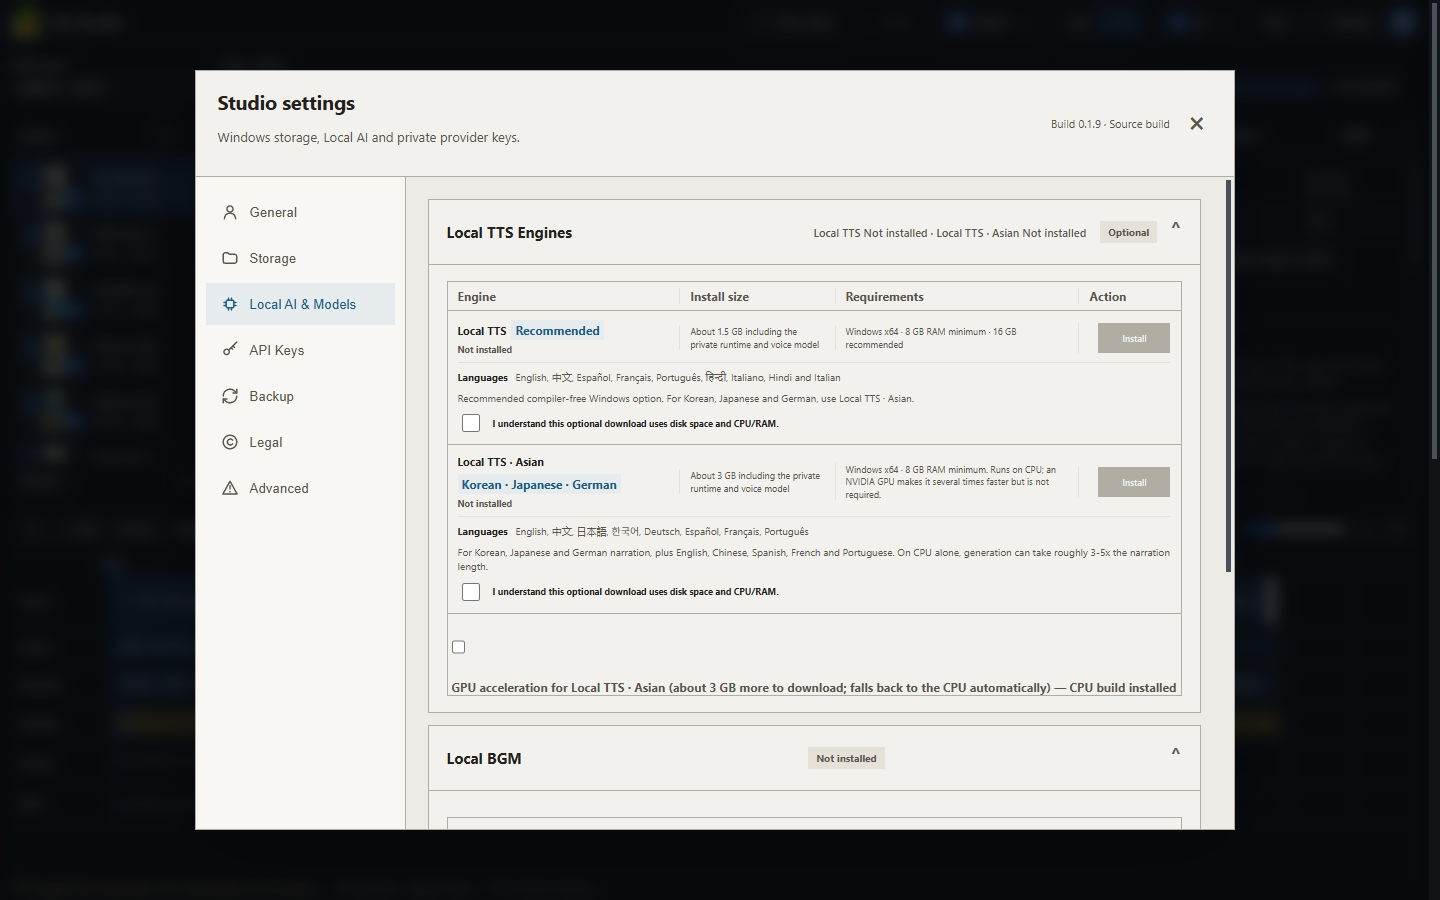
Local AI & Models
Install, update or remove Local AI, Local Captioning, Local TTS engines and Local BGM, each with its size, requirements and languages.
API Keys
Connect OpenAI, Claude, Gemini and ElevenLabs. Keys are stored only on this PC.
Backup
Back up projects and settings.
Legal
Licences and terms, including the Stability AI Community License for Local BGM.
Advanced
Activity log for troubleshooting, Restart Studio and Uninstall Studio (your projects are kept).
Local AI & Models
Local AI comes in Medium and High. Medium needs a dedicated graphics card with at least 6 GB of memory; High needs more. If your PC is below that, skip Local AI and use Gemini in Chrome — it writes better plans anyway. Run the System Check if you are not sure.
Settings → Local AI & Models: the Local TTS engines.
Do I need API keys?
No. Gemini in Chrome, the copy-and-paste route and the local services are free. Add your own keys for cloud writers and voices — that spends your own credits with those providers. All keys are stored locally on your PC.
Troubleshooting
Send to Extension does nothing
Open Chrome, make sure Google Flow Automator is signed in, and press Send to Extension again. See If the extension needs you for the message Studio shows.
Gemini in Chrome does not finish
The first time, make sure you pressed Allow Gemini and then Allow when Chrome asked — press Write it with Gemini in Chrome again if you missed it. Keep the Gemini tab visible until it is done, and check you are signed in to Gemini with your membership account. If it keeps failing, use the copy-and-paste route.
A picture does not match the narration
On Review, open Image prompt, adjust it, then press Make this picture again.
The explained picture appears too early or too late
On Review, set Appears at, or press Match the narration.
There are no voices to choose from
Install Local TTS in Settings → Local AI & Models, or connect an ElevenLabs or OpenAI key.
Narration & music will not finish
Add background music, upload a track, or tick No BGM.
I edited the narration but the voice didn't change
Changed words need new audio. On Narration & music, choose Only scenes that still need audio and press Generate narration.
Local AI is very slow or fails
Your graphics card is probably below 6 GB, or another heavy app is using it. Use Gemini in Chrome instead.
Studio won't open from the extension
Check the extension is signed in with the account that holds your membership. Trial and Starter accounts cannot open Studio.
How do I report a problem?
Use Help → Feedback & logs. Describe what you were doing and tick Attach privacy-safe diagnostic logs — they describe how Studio ran and never include your keys or media.
No match in the guide. Try a different word — or ask on the support page.